Introduction to HTML5
What is HTML?
Let us see what Wikipedia has to say:
Hypertext Markup Language (HTML) is the standard markup language for creating web pages and web applications. With Cascading Style Sheets (CSS), and JavaScript, it forms a triad of cornerstone technologies for the World Wide Web. Web browsers receive HTML documents from a webserver or from local storage and render them into multimedia web pages. HTML describes the structure of a web page semantically and originally included cues for the appearance of the document.
In cs952 you will be learning about these three key technologies:
- HTML5 - The structure of a Web Page (foundation of a web page),
- CSS3 - How the Web Page Looks (colors, styling)
- JavaScript - How the Web Page Behaves (animation, effects)
While it is possible to have a web page without CSS or JavaScript, you cannot create a web page without HTML. HTML, which stands for Hyper Text Markup Language, is the foundation for every web page. Whether a page was one of the very first pages created by Tim Berners Lee in 1989, or the newest page uploaded to the web seconds ago, HTML is the fundamental code all web pages are based on.
The first thing you should know about HTML is that it is a markup language. What does this mean? It simply means that we take the basic text, or content of our website, and "mark it up" to tell the web browser how we want the text displayed.
Here is a good definition from Webopedia:
Markup languages are designed for the processing, definition and presentation of text. The language specifies code for formatting, both the layout and style, within a text file. The code used to specify the formatting are called tags. HTML is a an example of a widely known and used markup language
Let us look at a few examples. Here is some basic text:
"How to learn HTML. Learning HTML is pretty easy. Start with some basic text, then place tags around the text to mark the text up."
In HTML, we start with basic text, then surround the text with tags. The tags have different functions. To turn a simple line of text into a heading, we use heading tags, <h1></h1>. To mark text as being a paragraph, we can use paragraph tags, <p></p>.
Most of the HTML tags we will use have an opening and closing tag. As with nearly every rule you learn, there are a few exceptions. For example, images only have one tag, but these exceptions are few and far between. So we can generalize and say that most HTML tags require an opening and closing tag. These tags are the "markup" in the name "Hyper Text Markup Language."
If we want the first line of text, "How to learn HTML", to be a heading, then we simply put a heading tag around the text.
There are six sizes of heading tags defined in HTML. The largest heading tag is the h1 tag, and the smallest is the h6 tag. This is how we transform the simple text "How to learn HTML" into a heading:
<h1>How to learn HML</h1>
Notice that we have an opening tag, <h1>, and a closing tag, </h1>. These two tags are very much the same, except for the "forward slash" that defines the closing tag.
What does this text look like in a web browser?
How to learn HTML
<h1>How to learn HML</h1>
What would the same text look like with the h2 tag?
How to learn HTML
<h2>How to learn HML</h2>
Or the h6 tag?
How to learn HTML
<h6>How to learn HML</h6>
As you can see, the h6 heading is actually pretty small!
Another very commonly used tag is the paragraph tag. As you might expect, we use the paragraph tag to mark sections of text as paragraphs.
This text that you are reading right now is contained inside paragraph tags:
<p>This text that you are reading right now is contained inside paragraph tags:</p>
Block Elements
Paragraph tags are a great example of a block element. A block element likes to stretch out and will always start a new line. A block element will always to take up the full width available. Typically, there is nothing to the left or right of a block element because it fills up as much space as it can horizontally.
The <p> element is a block-level element. Examples of other block-level elements: <h1> - <h6>, <div>, <form>, <header>, and <footer>. Block elements can have a width, and be centered.
If you were to look at the code used so far on this page, it is all made up of block elements. Each new section of text adds some space above and below, so that it is clear to you, the reader, that the information is divided into sections. This is a basic feature of HTML, and goes right back to the roots of the World Wide Web as a way to easily share information formatted as text.
<div> the Ultimate Block Element
Perhaps the most used block element in modern website design is the <div> tag.
Why? Aside from having the basic display property of "block", the <div> tag has very few other properties. So the <div> tag is like a blank slate, perfect for assigning various properties to. When you start integrating various Bootstrap 3 elements into your website, you will see that much of the code is made up of <div> elements assigned to various Bootstrap 3 classes. The <div> tag is used as a "box" or as a "wrapper" to contain other elements.
Inline Elements
What is the opposite of a block element? That would be an inline element. An inline element does not start on a new line and only takes up as much width as necessary. The anchor, or <a> tag is an inline element. Examples of other inline elements: <img> and <span>. Inline elements stay "inline", they do not start a new line, and they do not try to take up the full width available.
Let us take an example of the anchor, or <a> tag, working as an inline element. In weeks five and six we will learn more about anchors, but anchors are used to create the hyper links, or just links, that make up the "hyper" part of the "Hyper Text Markup Language" (HTML).
Follow the link to W3 Schools to learn more about display and block elements. Notice that the link "W3 Schools" did not start a new line, but the link W3 Schools stayed "inline" with the rest of the text. That is because the anchor, or <a> is an inline element. Here is the code used to create the anchor, or hyperlink:
Follow the link to <a href="http://www.w3schools.com/html/html_blocks.asp">W3 Schools</a> to learn more about display and block elements.
You will notice that, like the <p> or paragraph tag, or the <h1> or heading tag, that the <a> tag has an opening and closing tag. The link starts with <a> and closes with </a>.
The anchor tag is a little more complicated, because we need to include the URL, or web address, of the page we will be linking to. That is the part that follows the text "href".
<span> the Inline Equivalent of the <div> tag
Just as the <div> tag is a block element with virtually no properties other than the display property of "block", the <span> tag has almost no properties other than "display inline". The <span> tag does not get used nearly as often as the <div> tag, probably because there is not the same level of need for the flexible inline <span> tag, but it is there any time you need to wrap some content without adding any additional properties.
HTML Elements
You may have noticed that we have been using the term "element" without really defining what an "element" is. When we are working with HTML, we use the term "element" to refer to both the tag, and the content. You can think of an element as a complete set of HTML code. So if I asked what is a good example of the "h2 element" on this page, you could point to this code:
<h2>How to learn HML</h2>
Now that you are familiar with tags and elements, we can step back and take a look at the bigger picture of the various elements used to create a web page.
The Elements of a Web Page
So, we have looked at simple examples of elements, like the <h2> element:
<h2>How to learn HML</h2>
Web pages are created by putting elements inside of other elements. We call this nesting. The element which holds another element is referred to as the "parent" element, and the element inside another element is referred to as the "child" element.
The <html> tag
The ultimate "parent" element is the HTML element. All the content that makes up a web page is contained inside an opening <html> tag, and a closing </html> tag. This lets the web browser know that the content is a web page! If the text is outside of the <html> tag, then it is not Hyper text Markup Language, or html.
The <head> and <body> tag
Inside the <html> tags are two children tags, the <head> tag, and the <body> tag.
I think of the <head> tag as containing the "rules of the game." These are descriptions of the web page, links to other types of code, such as CSS, needed for the web page. You do not see this content on the web page.
The title of the web page, shown at the very top of the web browser, is contained in the <head> tag, inside a title tag, written as <title></title>.
So the <html> tag is the parent tag for the entire page. The <head> tag is a child of the <html> tag, and the <title> tag is a child of the <head> tag.
The visible content on a web page is contained inside the <body> tag. When we are adding images to our web pages, videos, or text, we are adding content to the body section.
Here is perhaps the most basic web page possible. The page has a title, "My Web Page", and it has one paragraph, which reads "This is my web page."
This is what this page would look like in code:
<html>
	<head>
		<title>My Web Page</title>
	</head>
	<body>
		<p>This is my web page.</p>
	</body>
</html>
Notice that in the above example, each child is indented, moved a bit to the right, to make it clear that it is the child of the parent element.
This is only done for the convenience of humans to look at the HTML code and quickly understand how the elements are related to each other. The "white space" or blank space, is ignored by the web browser.
Consider this code:
<html><head><title>My Web Page</title></head><body><p>This is my web page.</p></body></html>
This code would be rendered, or displayed, by the web browser, exactly the same as the first block of code. To the web browser, the code is the same.
Rendering a Web Page
When web developers talk about how code is displayed on a web page, they frequently use the term "render" rather than the more common term "display." "Rendering" is more accurate, since the term "rendering" suggests a more active process than simply displaying information. A web browser will take all the information contained in the HTML code, plus display rules from CSS, and behavior rules from JavaScript, and then calculate, or "render" the final page for you to see.
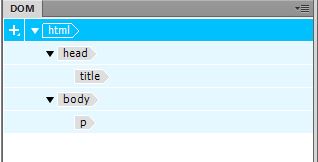
DOM: Document Object Model
We have a special term for all this HTML content on a web page, where we think of the entire web page as a tree, with different points, or "nodes". We call this the "Document Object Model", or DOM.
In Dreamweaver, we can take advantage of the DOM panel to give us a clear visual display of the various elements on our web page, and how the elements are nesting.
Here is a picture of the simple web page we created, displayed using the Dreamweaver DOM panel:
Nesting Elements
As you can tell we can nest a lot of elements inside of other elements. There is no limit to the levels of nesting. When we are working with Bootstrap 3, you will notice that we can easily have seven or eight levels of nesting.
But there is one very important rule when it comes to nesting HTML elements: The last element created, or "child" element, must be closed before closing the "parent" element!
Notice in the example above that the <title> tag is closed with the </title> tag, then the parent <head> tag is closed with the </head> tag:
<html>
	<head>
		<title>My Web Page</title>
	</head>
	<body>
		<p>This is my web page.</p>
	</body>
</html>
If you do not follow this rule, your page will have errors, and will not be displayed properly.
In cs952, much of this work is done for us by Dreamweaver.
In fact, just about all of this code will be generated automatically. But on occasion we will be making changes to the code directly, or we will be pasting in code copied from other sources. It is always a good idea to have some understanding of the fundamentals of the code you are working with.
Adding Comments to Your Code
HTML provides a very convenient way to add comments to your code. "Comments" are like little notes placed in your code. Comments can be used to explain what certain code is used for, or to help you document how a web page works. Comments to do not anything. By their nature, they are inactive code. We indicate that code is a comment by using the very special comment tag. We start our comment with "<!-- " and end the comment with "-->".
If you were to look at the source code for this page, you would find this comment just above the beginning of the JavaScript:
<!-- jQuery (necessary for Bootstrap's JavaScript plugins) -->
This commented line of code does nothing. The comment is placed there to help the web developer know that what follows is the jQuery code needed for the Bootstrap JavaScript plugins.
Commenting code is a bit like indenting code. This is done mostly to help out the humans, as the web browsers generally ignore this code.
Using Comments to Turn Web Code On and Off
Commenting code can also be used as a very powerful tool in developing and maintaining your website. Whatever is inside the "<!-- " and "-->" is inactive code. This means that you can use the comment tags to turn entire sections of web code on and off. You do not need to delete your code from the web page, you can keep it in place, perhaps as a reference.
Perhaps once every few months you need to include some additional information about a reoccuring event. Rather than delete, cut, copy or paste the code as it is needed, you can just place comment tags around the code when the code is not needed, then remove the comments when you want the code to be active again.
What happened to HTML5?
So far, we have been looking at basic HTML. You might be wondering, what happened to the HTML5 mentioned at the beginning of this section? HTML5 is the latest version of HTML. We have been covering the fundamentals of HTML, so the rules and properties you have been learning about basically have not changed since the beginning of the web.
We will be using HTML5 elements in our websites. When you create your website development page, you will be using the HTML5 semantic tags "section" and "footer", and we will be using the HTML5 "audio" and "video" tags when you create your media page, but that is a few weeks off!
In the meantime, you now have some familiarity with the basics of HTML.
Wayne Joness
West Los Angeles College, cs952
Fall